Frequently Asked Questions- Pronto
Pronto is a full featured, Windows based Software designed specifically for PM series recording analysis.
Click here for more information about Pronto for Windows
How do I download the data from my analyzer?
If you have a PM7000, the first place to look is the Start Guide on your Customer CD which has pictures and detailed instructions on how to download your data using Pronto for Windows (Eighth Step). We are actually in the middle of writing quick start guides for all of our other loggers but since the download process is similar for all of them, other users can also look at this start guide for reference. Alternatively refer to this quick overview below.
1. Install Pronto for windows using your customer CD and following the instructions.
2. When you open Pronto, the 'Startup Assistant' will appear.
3. Select 'Control and/or Playback data from a logger' and click on 'Next'.
4. Select' Create new connection settings' and click on 'Next'.
5. Select the type of logger you want to connect to.
6. Write in the COM Port or 'Search' to find the COM port to which your logger is connected, then click 'FINISH'.
7. Select your instrument for playback and 'Connect'. If your logger is still recording you will need to stop it, in order to download the data. With the PM7000, you can set the logger to download in a FIFO (First In First Out) mode onto a memory stick, meaning you never have to stop recording.
8. Once the data has downloaded, you can choose where to save it. Click on 'New' as it is a new project, decide where to save it and do so.
9. You will then be taken back to the previous screen where you can 'AutoSave' or 'Save'. N.b. If you have multiple sessions in your logger, Autosave saves all of them to the same project.
10. Good luck with analyzing and reporting on your data. The Graph assistant can now help you with the next bit.
The layout of Pronto has recently changed. It looks great but since I was used to the old version, do you have anything to help me understand the new layout?
Yes we do! Phil, who has designed most of the new Pronto layout, has recorded some video tutorials to help you through the transition. There are lots of new benefits to make analyzing and reporting on your data easier. Please go to our Tutorials and Videos page.
What version of windows do I need in order for my computer to be compatible with Pronto?
All the information you need is in our Knowledge Base. Look at the Application (App) Note Computer Requirements to run Pronto for Windows for the information you're looking for.
Pronto should run on Windows 95, however we currently only test our software on Windows 2000 and later. Regrettably we are unable to support versions of Windows before this date (Windows 2000).
Does Pronto choose the correct Baud rate for each unit when it connects for download or do I have to program it manually?
Pronto will automatically choose the correct Baud rate for the logger the first time it connects with your PC. If it hasn't for whatever reason it is possible to amend it manually by selecting 'Create new connection settings' in the Startup Assistant (Step 2). Carry on through steps 3 and 4 and when the 'Select Instrument for Playback' screen appears click on 'Edit'. This will then give you the option to amend the baud rate for your logger.
The recommended rate for the PM1000, PM2000 and PM3000 (most of the time) is 115200 and for the PM7000 USB it is 921600, for the PM7000 Bluetooth it is 115,200. For our other loggers please refer to our Knowledge Base.
How do I export graphs, tables and reports from Pronto?
All the information that you need to know in order to either COPY and PASTE your graphs into Word, print to PDF or export to Excel can be found in our Knowledge Base.
If you would like help creating graphs and tables please watch the relevant tutorials on our Tutorials and Videos Page.
Can I download my recorded data via Bluetooth?
Yes you can, it just takes longer than by USB, Infra-Red or ethernet.
How do I work out a cumulative value for kWh in Pronto?
First of all make sure you have recorded Real Power (kW) as a parameter on one of your recording channels.
Once you have downloaded your data into Pronto, select this data and produce a graph of Real Power for the duration of your recording. Now you can get the cumulative results of the data shown on your graph.
Select the data stream on the graph, in this case the Real Power (kW) data stream. Once this is highlighted the 'Sum' icon on the tool bar becomes live, as shown below.
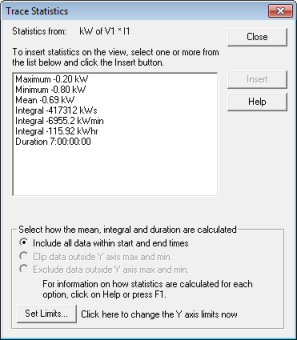
f you now click on this it will give you the data you require as trace statistics, the trace being the line you have selected on the graph.
The integral kWhr value is what you are looking for. In this example the sensor was put on the wrong way round, hence the negative results. The duration of the recording shown on the graph selected was 7 days.
Note that this information will change depending on the data showing on your graph. If the graph covers a week, your results will be over the week, if you have zoomed into a particular day, the trace results will be generated from that day's results. This way you can pick and choose exactly when (and over what part of your recording) you want your answer to originate from.
In Pronto, how do I scroll quickly through each of my recorded waveforms?
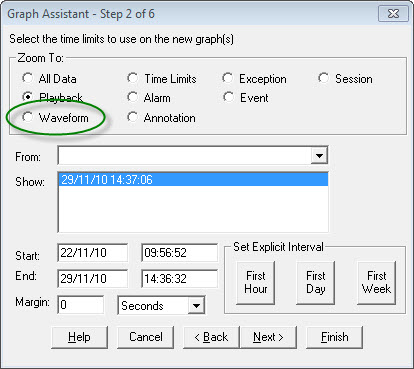
When you first open Pronto, open the relevant project you want to analyze. Select (highlight) the data stream with the waveforms you wish to view e.g. Input Van (V1) (Transient) and create your graph using the Graph Assistant. On the second step of the assistant you can select 'Zoom To: Waveform' as circled below. (In previous versions of Pronto the term to select is 'AC Snapshot' if Waveform is not available).
(Pronto is currently going through a fairly major facelift so will look slightly different in very new versions. The principle though is still the same.)
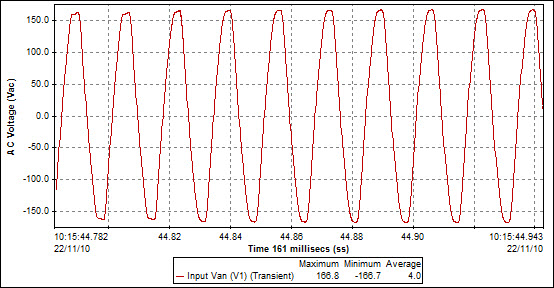
Either complete the steps with the Graph Assistant or click on 'FINISH'. The graph you will see (unless a different one has been selected) will be of the first waveform caught during your recording.
Either complete the steps with the Graph Assistant or click on 'FINISH'. The graph you will see (unless a different one has been selected) will be of the first waveform caught during your recording.
To scroll to the next waveform click on the double arrows in the tool bar. This will let you scroll through all the waveforms recorded on that datastream.
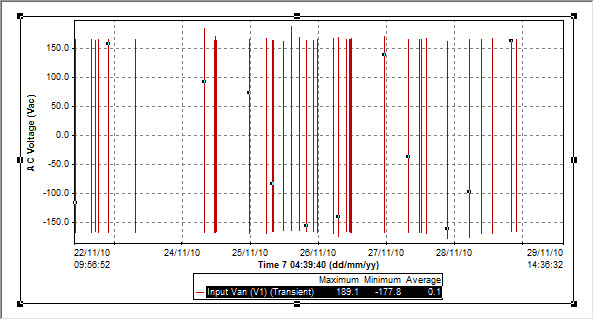
If however, you have already opened your graph, with all the waveforms as below, you can still scroll through your waveforms without going back through the Graph Assistant. Firstly, make sure the trace (the relevant line on the graph) is selected.
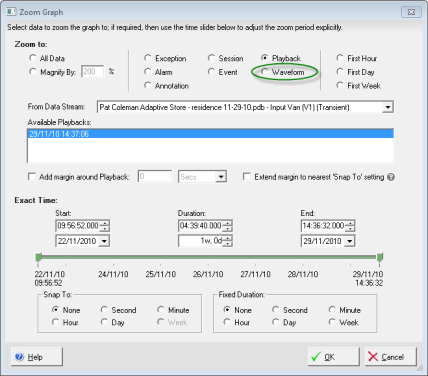
From the menus on the top of the screen, Click on 'Graph', then 'Zoom...' in the drop down menu to bring up the following 'Zoom Graph' assistant. Note in earlier versions of Pronto this assistant may look slightly different.
Select 'Waveform' (in older versions this may be called AC Snapshot). Click on 'OK'. The graph you now see will be of the first recorded waveform zoomed in to span the entire graph. Now you can click on the double arrows in the tool bar to scroll forward and back through your waveforms.
Is it true that I can get Pronto upgrades for free at any time?
Yes, any user with a legitimate version of Pronto for Windows* (version 5.50 or later) can get unlimited upgrades through the web update utility PmUpdate.exe installed with Pronto to retrieve the latest software updates (internet access required).
In Pronto, from the tool bar at the top of the page select 'Help', then 'Check for Updates' and follow the Update Assistant.
Exception: If you have Pronto 5.50 you will have to go through the folder system on your computer to get your update as it is not available from the drop down menu in the software itself.
If you are having any problems with you update please do contact us or visit our Knowledge Base page 'APPNOTE: Known issues running PmUpdate, the web update utility.'
*Hire customers may have a time limit imposed on their version on Pronto for Windows.
Will the Pronto CD I received with my original kit still work if I upgrade my computers to Windows 7?
On your Pronto for Windows CD, there is a number on the front showing which version it is.
Releases 5.64 and later of Pronto for Windows will install and run correctly on Windows Vista or Windows 7. When Pronto is open you can update your version of Pronto to the latest by running PmUpdate (via the internet). From the tool bar at the top of the page select 'Help', then 'Check for Updates' and follow the Update Assistant.
Releases 5.50 to 5.64 will also need to be updated (via the internet) by running PmUpdate, however you will need to run PmUpdate from the Pronto installation folder on your computer rather than through Pronto itself. Please follow the steps below:
1. Install Pronto off your CD, however, during the installation process when you reach the 'Set Destination Folder' screen of the installation assistant, you MUST save Pronto into the directory 'C:\Pronto4w' instead of the default 'C:\ProgramFiles\Pronto4w'. Otherwise you will encounter problems with write access.
2. Before you open Pronto, run PMUpdate which is found in the Pronto installation folder ('C:\Pronto4w\PmUpdate.exe').
3. Choose either the most up to date classic version of our software or our new generation of software with many new and exciting features (currently a Beta, as of 2nd December 2013). Both will work well on Windows 7.
Releases prior to 5.50 do not have this upgrade function and will not work on Windows 7. Contact us for a copy of the latest release.
For more information take a look at the Application (App) Note Computer Requirements to run Pronto for Windows in our Knowledge base.
My Functions Panel has disappeared in the new version of Pronto. Can I get it back?
Any version of Pronto for Windows starting with 6. will have a screen specific Functions Panel which appears on the right hand side of the screen. If for any reason this has disappeared you can switch it on again by clicking on 'View' in the tool bar at the top of the page and selecting 'Functions Panel'. This will bring it back into view.
Although it's worked in the past, I've now got a problem with your software update facility, PMUpdate, on my new computer. How do I fix it?
Recently we've noticed a problem with some of the new anti-virus checkers that have been coming out with new computers. We've fixed the problems with ones we know about, so do try the download again, but your new version of anti-virus may have slipped through the net. If you are having a problem updating your version of Pronto via the web please review our APPNOTE: Known issues running PmUpdate, the web update utility, in our Knowledge Base to help you solve your problem.

